An Introduction to Web Mapping with React and LeafletJS
React is one the most popular open-source JavaScript library created by Facebook for building reusable interactive User Interface (UI) components. It’s widely used for single-page applications. Basically, react application is made up of a bunch of components that can reusable. React creates a virtual DOM Document Object Modifier in memory instead of modifying dynamically generated browser DOM as traditional frameworks/libraries do.
React-leaflet is a react binding leaflet map that renders leaflet layers inside Leaflet in react application. React is not directly rendered the Leaflet layers to the DOM instead, it renders an <div> element when rendering the MapContainer component and the contents of UI layers components.
Pre-requisite for ReactJS
NodeJS and NPM
create-react-app
Step -01: Install NodeJS and NPM
NodeJS and NPM are the platforms need to develop any ReactJS application. So, first, we need to install it. Node Version Manager (NVM) is a version manager tool for node.js. We will install NodeJS using NVM.
Visit the NVM GitHub repo https://github.com/nvm-sh/nvm and get the latest version of NVM.
curl -o- https://raw.githubusercontent.com/nvm-sh/nvm/v0.39.1/install.sh | bashNext, export and configure the nvm path.
export NVM_DIR="$([ -z "${XDG_CONFIG_HOME-}" ] && printf %s "${HOME}/.nvm" || printf %s "${XDG_CONFIG_HOME}/nvm")"
[ -s "$NVM_DIR/nvm.sh" ] && \. "$NVM_DIR/nvm.sh"
Install the latest version of NodeJS by typing the following command -
nvm install --ltsYou can also check the NodeJS remote version by -
nvm ls-remoteTo install the specific version of NodeJS, mention the version during the installation time.
nvm install v17.8.0Now check the NodeJS NPM version to verify the installation.
node --version
npm --version
Step -02: Install and Create React App
There are different ways to install and configure ReactJS. The essayist's way to install react is by using create-react-app. Navigate to the directory where you want to create a react app. Now, open your terminal, navigate to the installation directory and paste the following command -
npm install create-react-app react-leaflet-demoThe above command will create a react-leaflet-demo on your installation directory.
Step -03: Verify React Installation
In your command shell, type -
npm startIt will start the react application, and you will the default page.
Step -04: Install Leaflet and React-Leaflet
Now, install the leaflet and react-leaflet using npm.
npm install leaflet react-leafletStep -05: Create a Map Components
Open the App.js file and edit the App function to add a leaflet map.
import './App.css';
import 'leaflet/dist/leaflet.css'
import { MapContainer, TileLayer } from 'react-leaflet';
function App() {
return (
<>
<MapContainer
className='map'
center={{ lat: 51.505, lng: -0.09 }}
zoom={13}
scrollWheelZoom={true}>
<TileLayer
attribution='© <a href="https://www.openstreetmap.org/copyright">OpenStreetMap</a> contributors'
url="https://{s}.tile.openstreetmap.org/{z}/{x}/{y}.png"
/>
</MapContainer>
</>
);
}Now, open your App.css and add the height and width of the map.
.map{
  height: 600px;
  width: 100%;
}
Step -06: Adding Marker on Map
To add a marker on Map at a specific position, we need to define the marker location (lat/long)
import { Marker } from 'react-leaflet';

const position = [51.505, -0.09]
function App() {
return (
<>
<MapContainer
className='map'
center={{ lat: 23.85, lng: 89.09 }}
zoom={13}
scrollWheelZoom={true}>
<TileLayer
attribution='© <a href="https://www.openstreetmap.org/copyright">OpenStreetMap</a> contributors'
url="https://{s}.tile.openstreetmap.org/{z}/{x}/{y}.png"
/>
<Marker position={position}>
</Marker>
</MapContainer>
</>
);
}
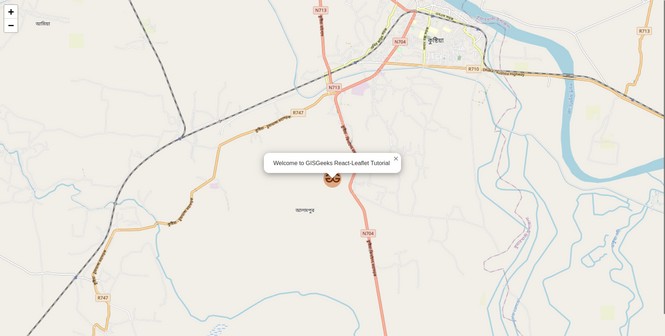
Step -06: Adding Popup to Marker
import { Popup } from 'react-leaflet';Now, add a popup inside the Marker.
<Marker position={position}>
  <Popup>
    Welcome to GISGeeks React-Leaflet Tutorial
  </Popup>
</Marker>
Step -07: Add Custom Icon instead of the default icon
First, import the Leaflet and custom icon image.
import L from "leaflet";
import icon from '../img/favicon.png';
Define the icon size and path.
const myIcon = new L.Icon({
      iconUrl: icon,
      iconRetinaUrl: icon,
      popupAnchor:  [-0, -0],
      iconSize: [32,45],
  });
Now, add the custom Icon to the marker.
<Marker position={position} icon={myIcon}>
   <Popup>Welcome to GISGeeks React-Leaflet Tutorial</Popup>
</Marker>
Share To
About Author
- Kamal Hosen
Geospatial Developer | Data Science | PythonA passionate geospatial developer and analyst whose core interest is developing geospatial products/services to support the decision-making process in climate change and disaster risk reduction, spatial planning process, natural resources management, and land management sectors. I love learning and working with open source technologies like Python, Django, LeafletJS, PostGIS, GeoServer, and Google Earth Engine.